Suppose you have two entities in Home Assistant, and you want to multiply them together to produce a third entity that always shows the product of these two entities. Here’s how I went about it.
One of Home Assistant’s built-in integrations is Template. These Template entities derive their status from other entities in Home Assistant, and appear in the Home Assistant web interface as Helpers. You can do some fancy things with these, but all I want to do is multiply the value of one by the other.
Calculating export income
In my case, I wanted an entity that shows how much I’m earning from exporting excess energy generated by my solar panels, once our home battery is full. The amount exported is available as an entity in the SolaX Modbus integration that I use, expressed as a value in kWh. I also use the Octopus Energy integration with Home Assistant, and this has an entity showing my current export rate in £ per kWh. So, multiplying these together will show how much I should be making when I export.
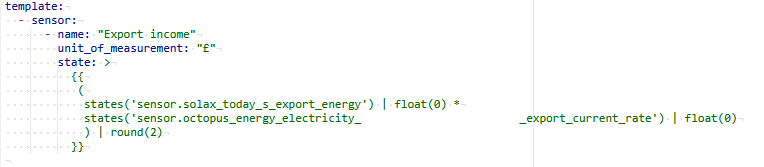
This should be possible to set up as a Helper in the Home Assistant interface, but I personally found it easier to do so in YAML. Also, this is where I was able to ask ChatGPT to help write the YAML code. After tweaking its output to fit my needs, here’s what I’m using:
template:
  - sensor:
      - name: "Export income"
        unit_of_measurement: "£"
        state: >
          {{
           (
            states('sensor.solax_today_s_export_energy') | float(0) *
            states('sensor.octopus_energy_electricity_[mymeter]_export_current_rate') | float(0)
            ) | round(2)
          }}
The name is a human-readable name that I have given to the entity. The unit of measurement is optional – Home Assistant will accept just about anything you type in here, but as the amount will be currency I’ve put in the £ sign.
The ‘state’ bit is where I needed help from ChatPGT, as this isn’t really standard YAML here. We specify the first entity, and add '| float(0)'. The ‘float’ is necessary to provide a floating point number. The * character represents multiplication, and then we repeat the same notation for the second entity. Finally, we specify ‘| round(2)‘ so that the resulting entity rounds to two decimal places. Which, when dealing with an amount of money, makes sense as 0.3333 of one pence isn’t really worth knowing about.
As with any changes to Home Assistant’s YAML configuration, you’ll need to restart Home Assistant after setting this up. You’ll then have a nice new helper, in my case ‘sensor.export_income‘ to plop somewhere on your dashboard. Personally, I have it as a badge which appears once the value is higher than 0. Which, at this time of year, isn’t very often, but we did have a nice enough day a couple of weeks ago to be able to export some electricity.